-
Making our Android Studio Apps Reactive with UI Components & Redux프로그래밍/Kotlin 2020. 11. 8. 22:56반응형
아래 글을 번역한 내용입니다.
netflixtechblog.com/making-our-android-studio-apps-reactive-with-ui-components-redux-5e37aac3b244
Making our Android Studio Apps Reactive with UI Components & Redux
By Juliano Moraes, David Henry, Corey Grunewald & Jim Isaacs
netflixtechblog.com
Netflix는 Prodicle이라는 TV프로그램과 영화 제작을 담당하는 모바일앱을 구축했다. Android와 iOS앱으로 제작되었고 4명의 엔지니어가 3개월에 걸쳐서 제작했다.
이 앱의 기능은 제작 스테프들이 촬영 스케쥴을 조정하고 제작에 참여하는 모든 사람들에게 현재 진행중인 상황에 대해 정보를 제공한다.
아래는 Glow 시즌3의 촬영 스케쥴이다.

넷플릭스에서 2년동안 안드로이드에 reactive한 컴포넌트를 적용하기 위해 실험한 아이디어를 공유하려고 한다. 이를 도와주는 프레임워크가 있긴 하지만 Android API만 이용해서 구현하려고 했다.
Reactive한 컴포넌트라는 것은 확장 가능하고 재사용이 가능하며 단위 테스트가 가능하며 AB테스트가 쉽도록 구성이 가능한 UI를 만들기 위한 핵심 기반이다. Composable한 UI는 유저 요구사항에 맞게 조합이 쉽고 선택이 쉬운 UI로 사이드 이펙트가 적고 개발자가 빠른 개발을 할 수 있도록 도와준다.
넷플릭스의 안드로이드앱의 플레이어 UI는 Componentization Architecture를 사용한다. 이 이론을 바탕으로 Prodicle 앱을 만들면서 Redux, Component들, 100% Kotlin를 사용해서 처음부터 구축했다.
Overall Architecture

Fragments & Activities
일단, Fragment는 view가 아니다. 커다란 Fragment와 Activity는 코드를 읽고 관리하고 확장하기 어렵게 만든다. 이 코드를 캡슐화하고 책임단위로 쪼개야 코드 관리가 쉬워진다. 즉, 뷰를 대변하는 프레젠테이션 로직은 프래그먼트 안이 아닌 컴포넌트나 다른 클래스 안에 있어야한다.
아래 방법은 프래그먼트를 어떻게 클린코드하는지(비지니스로직은 없다), onViewCreated()에서 pre-inflated된 뷰 컨테이너와 redux 저장소의 dispatch함수를 전달한다.
// MilestonesScreen.kt
class MilestonesScreen : Fragment() {
   override fun onViewCreated(view: View, savedInstanceState: Bundle?) {
       ...
       ToolbarComponent(contentContainer)
       ListHeaderComponent(contentContainer)
       ShootingDayUnitSelectorComponent(contentContainer)
       ListComponent(contentContainer)
       BottomNavigationComponent(contentContainer)
       ...
UI Components
UI 컴포넌트들은 xml 레이아웃을 가지고 있다. ComponentState는 데이터 클래스이고 ComponentState를 가지는 단일 렌더러 인터페이스를 구현한다.
컴포넌트의 render() 메소드는 가질 수 있는 상태에 대해서 쉽게 테스트할 수 있는 퓨어 함수이다.
Dispatch 함수들은 컴포넌트들이 앱의 상태를 변경하거나 네트워크 요청을 하거나 다른 컴포넌트와 상호작용할 수 있도록 한다.
하나의 컴포넌트는 데이터 클래스로된 뷰에 표시될 값을 가지고 이 상태 클래스는 파일의 제일 상단에 있다.
그리고 뷰그룹 컨테이너를 컨스트럭터 파라미터로 받고 모든 뷰는 lazy 를 이용해서 초기화하고 render() 메소드는 이 뷰들 안에서 모든 값을 셋팅한다.
// ListHeaderComponent.kt
data class ListHeaderComponentState(
   val selectedShootingDay: ShootingDay?,
   val canEditShootingDay: Boolean = false
)

class ListHeaderComponent(
   private val container: ViewGroup,
   private val dispatchFunction: DispatchFunction
) : UIComponent<ListHeaderComponentState>() {

   private val root =
       LayoutInflater.from(container.context).inflate(
           R.layout.list_header,
           container,
           true
       )

   @VisibleForTesting(otherwise = VisibleForTesting.PRIVATE)
   val dateLabel by lazy {
       root.findViewById<TextView>(R.id.list_header_date)
   }

   @VisibleForTesting(otherwise = VisibleForTesting.PRIVATE)
   val titleLabel by lazy {
       root.findViewById<TextView>(R.id.list_header_title)
   }

   @VisibleForTesting(otherwise = VisibleForTesting.PRIVATE)
   val editButton by lazy {
       root.findViewById<ImageButton>(R.id.edit_button).apply {
           setOnClickListener {
               dispatchFunction(saveAction())
           }
       }
   }

   override fun render(state: ListHeaderComponentState) {
       state.selectedShootingDay?.let {
           dateLabel.text = formatDate(it.shootingOn, DateFormat.HEADER, it.timeFormat)
           titleLabel.text = it.title
       } ?: run {
           dateLabel.text = ""
           titleLabel.text = ""
       }

       if (state.canEditShootingDay) {
           editButton.visibility = View.VISIBLE
       } else {
           editButton.visibility = View.GONE
       }
   }
}
Layout
모든 컴포넌트는 디자인적으로 독립적이고 이 의미는 각각의 컴포넌트에 대해서 서로 모른다는 의미이다. 하지만 우리 스크린 안에서 컴포넌트들을 배치를 하긴 해야한다. 이 구조는 아주 유연하고 이 구조를 만들기 위해 다양한 방법을 제공한다.
1) 컨테이너에서 스스로 inflate하는 컴포넌트 : 컴포넌트는 컨스트럭터에서 뷰그룹을 받아서 Layout inflater를 이용해 inflate한다.
2) 미리 inflate된 뷰를 가지는 컴포넌트 : 컴포넌트가 컨스트럭터에서 뷰를 받아서 inflate할 필요 없도록 한다. 화면에서 단일 xml를 가질 때 사용된다.
Redux
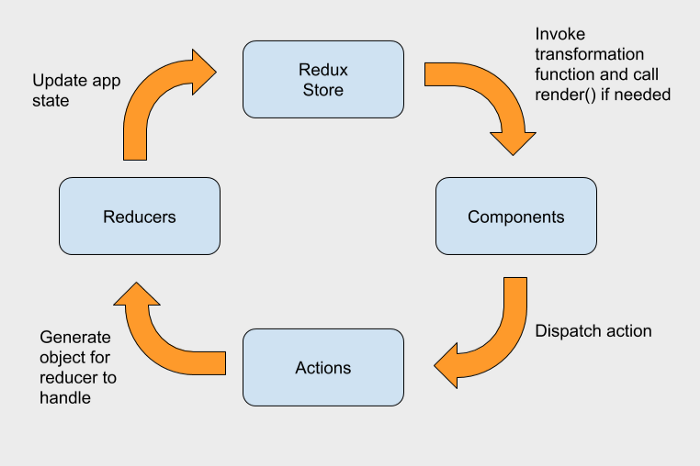
Redux는 Action다음 Reducer로만 변경될 수 있는 이벤트 주도형 단방향 데이터 흐름 구조를 제공한다. 이 이벤트는 앱 상태를 이용하는데 중앙집중형이다.? 앱 상태가 변경되면 이벤트는 모든 subscribe된 컴포넌트들에게 차례로 전달된다.
중앙관리형 앱상태를 갖는다는 것은 serialization을 이용해 매우 간단하게 디스크에 저장할 수 있게 된다. 이런 상태는 영향을 미친 상태들을 되감기 기능을 공짜로 제공하는 것이다. 이런 디지털 영속성은 유저가 앱을 열었을 때 전의 상태를 그대로 유지할 수 있게 한다. 이런 영속성은 또한 안드로이드의 onSaveInstanceState()와 onRestoreInstanceState() 콜백에 대한 보일러플레이트 코드도 제거해준다.
The Render Loop
Render loop은 모든 구성요소를 반복하고 필요한 경우 component.render()를 호출하는 메소드이다. 컴포넌트는 render() 메소드를 호출하기위해서 앱의 상태 변화를 subscribe한다. 또한 성능 최적화 목적으로 특정 앱의 상태에 대해서만 transform 함수를 정의해놓을 수 있다. 예를 들면 selectWithSkipRepeats() 함수로 불필요한 앱상태를 무시하고 render 메소도를 호출할 수 있다.
ComponentManager는 컴포넌트들의 subscribe/unsubscribe에대한 책임을 가지고 있다. 이 manager는 Screen인 Fragment들과 1:1관계를 가지고 Configuration change에 대한 영속적 상태를 유지하기 위해 Android ViewModel을 확장했다. manager는 lifecycle을 알고 있고 onDestroy() 시점에 모든 컴포넌트를 unsubscribe한다.
다음은 Fragment에서 subscription과 transformation에 대한 내용이다.
class MilestonesScreen : Fragment() {
   override fun onViewCreated(view: View, savedInstanceState: Bundle?) {
       super.onViewCreated(view, savedInstanceState)

       with(uiComponentManager) {
           addAndSubscribeToStore(ToolbarComponent(toolbarContainer, store.dispatchFunction, this)) {
               it.selectWithSkipRepeats {
                   ToolbarComponentState(
                       projects = it.projects,
                       selectedProject = it.selectedProject
                   )
               }
           }

           addAndSubscribeToStore(ListHeaderComponent(contentContainer, store.dispatchFunction)) {
               it.selectWithSkipRepeats {
                   ListHeaderComponentState(
                       selectedShootingDay = it.selectedShootingDay,
                       canEditShootingDay = userHasCapabilities( UserCapabilityTypes.ManageData))
               }
           }
            addAndSubscribeToStore(UnitSelectorComponent(contentContainer, store.dispatchFunction)) {
               it.selectWithSkipRepeats {
                   UnitSelectorComponentState(
                       selectedShootingDay = it.selectedShootingDay,
                       selectedShootingDayUnit = it.selectedShootingDayUnit
                   )
               }
           }
ComponentManager 코드는 아래와 같다.
class UIComponentManager(
   val store: AppStore<AppState>
) : ViewModel() {
   private val componentSubscriptions = mutableListOf<UIComponent<out StateType>>()

   override fun onCleared() {
       super.onCleared()
       componentSubscriptions.forEach { store.unsubscribe(it) }
   }

   fun <T : StateType> addAndSubscribeToStore(
       uiComponent: UIComponent<T>,
       stateTransform: (Subscription<AppState>) -> Subscription<T>
   ) {
       componentSubscriptions.add(uiComponent)
       store.subscribe(uiComponent, stateTransform)
   }
}
Recycler views
컴포넌트들은 리스트의 안과 밖에서도 동작하도록 충분이 유연한 구조여야한다. RecyclerView와 함께 작업하기 위해서는 UIComponent와 UIComponentForList라는 것을 작성했고 ViewHolder를 확장해 Redux Store를 바로 subscribe하지는 않도록 작성했다는 것이 차이점이다.
Fragment:
Fragment는 Store를 subscribe하는 MilestoneListComponent를 초기화하고 global state를 component state로 변환하는 transformation함수를 정의한다.
addAndSubscribeToStore(MilestoneListComponent(contentContainer, store.dispatchFunction)) {
   it.selectWithSkipRepeats {
       MilestoneListComponentState(
           selectedShootingDay = it.selectedShootingDay,
           expandedMilestone = it.expandedMilestone,
           fetchingData = it.isFetching
       )
   }
}
List component:
리스트 컴포넌트는 여러 컴포넌트 타입을 지원하는 adapter를 사용하고 워커 쓰레드에서 diff를 수행해 adapter.update()를 호출하도록 하고, 아이템 컴포넌트들의 render() 함수를 onBind()가 호출되는 동안 호출해준다.
class MilestoneListComponent(
   container: ViewGroup,
   private val dispatchFunction: DispatchFunction,
   uiComponentManager: UIComponentManager
) : UIComponent<MilestoneListComponentState>() {

@VisibleForTesting(otherwise = VisibleForTesting.PRIVATE)
val recyclerView by lazy {
   rootView.findViewById<RecyclerView>(R.id.milestoneList)
}

private val adapter = object : ListComponentAdapter<MilestoneComponentState>() {
   override fun getComponentForList(viewType: Int): UIComponentForList<MilestoneComponentState> {
       return when (MilestoneType.values()[viewType]) {
           MilestoneType.CompanyMove -> MilestoneCardCompanyMove(
               LayoutInflater.from(container.context)
                   .inflate(R.layout.m_card_company_move, container, false),
               dispatchFunction
           )
           MilestoneType.CrewCall -> MilestoneCardCrewCall(
               LayoutInflater.from(container.context)
                   .inflate(R.layout.m_card_crew_call, container, false),
               dispatchFunction
           )
   }
}

override fun render(state: MilestoneListComponentState) {
     state.selectedShootingDayUnit?.milestones?.mapIndexed { index, milestone ->
       milestoneDataSetList.add(
           MilestoneComponentState(
               milestone = milestone,
               isExpanded = milestone.id == expandedMilestoneId,
               hasMoveButton = hasMoveButton(state, index, currentInProgressIndex)
           )
       )
   }?.let {
       adapter.update(milestoneDataSetList)
   }
}
Item list component:
아이템 리스트 컴포넌트는 리스트의 외부에서도 사용될 수 있는데, UIComponentList가 ViewHolder class를 확장했다는 사실을 제외하고는 다른 컴포넌트와 동일하다. 다른 컴포넌트들처럼 아이템 리스트 컴포넌트는 render() 함수를 구현했으며 data 클래스인 state를 모델로 갖는다.
class MilestoneCard(
   private val container: ViewGroup,
   private val dispatchFunction: DispatchFunction
) : UIComponentForList<MilestoneComponentState>(container) {

   override fun render(state: MilestoneComponentState) {
       ...
   }
Unit test
안드로이드의 유닛 테스트는 일반적으로 실행이 느린데, Activity나 Context, Lifecycle과 같은 의존성을 다 유닛 테스트가 시작할 때 moking하기 때문이다.
컴포넌트들의 render() 메소드는 다른 의존성을 만들 필요 없이 순수한 함수이다.
before() 함수 안에서 UI 컴포넌트를 초기화하고 모든 테스트에서 바로 render() 메소드를 모델 클래스과 함께 테스트할 수 있다. 다른 의존성의 주입은 별도로 필요하지 않다.
@RunWith(AndroidJUnit4::class)
class ListHeaderComponentTest: BaseTest() {
   private lateinit var uc : ListHeaderComponent

   @Before
   fun before() {
       uc = ListHeaderComponent(container, dispatchFunction)
   }

   @Test
   fun `testing empty render`() {
       uc.render(ListHeaderComponentState(null))

       Assert.assertEquals("", uc.dateLabel.text)
       Assert.assertEquals("", uc.titleLabel.text)

       Assert.assertEquals(View.VISIBLE, uc.dateLabel.visibility)
       Assert.assertEquals(View.VISIBLE, uc.titleLabel.visibility)
   }

   @Test
   fun `testing render`() {
       uc.render(
           ListHeaderComponentState(
               ListItem.defaultsIfNull(
                   id = "ID",
                   shootingOn = "20191010",
                   title = "MY TITLE",
                   shootingDayUnits = listOf(ShootingDayUnit.getInstanceForTest()),
                   timeFormat = TimeFormat.The12H
               )
           )
       )

       Assert.assertEquals(formatDate("20191010", DateFormat.HEADER, TimeFormat.The12H), uc.dateLabel.text)
       Assert.assertEquals("MY TITLE", uc.titleLabel.text)

       Assert.assertEquals(View.VISIBLE, uc.dateLabel.visibility)
       Assert.assertEquals(View.VISIBLE, uc.titleLabel.visibility)
   }
}
Conclusion
이 구조를 가진 우리 앱 첫번째 버전은 몇달전에 릴리즈되었고 이 성취에 만족하고 있다. 이 구조는 유연하고 재사용가능하고 테스트가능하다는 것이 입증되었고 현재 60%의 유닛테스트 커버리지를 가지고 있다.
이 공통 접근법은 플랫폼 의존성이 적으므로 다른 플랫폼으로 빠르게 이동할 수 있다. 데이터 레이어, 비지니스로직, 컴포넌트 구조는 코틀린에서 스위프트로 넘어갈 때에도 쉽게 만들었다.
이 구조를 수용하기 위해서 기존 패러다임을 벗어나 생각해야했고 이 목표는 플랫폼과 싸우는 것이 아니라 거친 가장자리를 부드럽게 만드는 것이다.
... 1년 뒤
클라이언트 플랫폼에 구애받지 않고 코틀린 멀티플랫폼을 사용하게 되었다. 코틀린으로 비지니스 로직을 작성하여 Android 용 코틀린 라이브러리와 iOS용 네이티브 유니버셜 프레임워크로 컴파일하는 방식으로 변경되었다.
netflixtechblog.com/netflix-android-and-ios-studio-apps-kotlin-multiplatform-d6d4d8d25d23
Netflix Android and iOS Studio Apps — now powered by Kotlin Multiplatform
By David Henry & Mel Yahya
netflixtechblog.com
더보기State란 무엇인가?
메모리에 살아있는 데이터
앱은 하나의 글로벌 state를 가지고 있어야 됨
State는 immutable이어야함
앱은 UI에서 이 State를 그린다.
What ? 위젯? 액티비티? 애플리케이션의 상태? -> 이런건 안드로이드가 신경쓰게하고 우리는 비지니스로직만 신경쓰면 된다.
data class State(val todoList: Lit<String>)
새로운 State만들기
State 인스턴스 생성은 kotlin 빌트인 카피 함수를 이용, shallow 카피를 한다.
Actions
새로운 State를 사용할때나 다음 State로의 변경할때 사용
State transition에 대한 정보를 담고 있음
Immutable해야됨
유니크해야됨
sealed class Action
data class AddTodoAction(val newTodoItem: String) : Action
data class UpdateTodoAction(val index: Int, val newTodoItem: String) : Action
when(action) {
is AddTodoAction -> …
is UpdateTodoAction -> …
}
Undirectional Data Flow
Data는 한방향으로만 전달된다.
State는 단일 클래스이고 수정포인트되는 한곳이다.
State는 수정되지 않고 새로운 State로 생성된다.
Redux는 단방향 데이터 흐름을 구현할 수 있는 라이브러리이다.
https://www.youtube.com/watch?v=QAOyjeD3_P8
Redux란 아주 간단하게 모든 데이터를 한 곳(State)에 다 땡겨서 저장해놓는 것이고 모든 로직(Reducer)은
파일캐시 처리
반응형'프로그래밍 > Kotlin' 카테고리의 다른 글
Coroutine exceptions handling (0) 2022.06.22 Coroutine - Cancellation and timeouts (0) 2022.05.09 Kotlin multiplatform 프로젝트를 생성해보자 (0) 2020.09.01 Lessons learnt using Coroutines Flow in the Android Dev Summit 2019 app (0) 2020.01.29 Improve app performance with Kotlin coroutines (0) 2019.11.29