-
Android Room 데이터베이스 코드랩프로그래밍/Android 2021. 3. 30. 18:00반응형
Android Architecture Components
Android architecture components는 Jetpack의 일부 라이브러리들이다. 안드로이드 앱을 쉽게 구성할 수 있도록 도와준다. ex. Room, LiveData, ViewModel 등이 있다.
https://developer.android.com/codelabs/android-room-with-a-view-kotlin
Android Room with a View - Kotlin | Android 개발자 | Android Developers
In this codelab you build an Android app in Kotlin that uses Android Architecture Components (RoomDatabase, Entity, DAO, AndroidViewModel, LiveData) together with Kotlin coroutines. This sample app stores a list of words in a Room database and displays it
developer.android.com
Room 사용해보기
의존성 추가
Room을 사용하기 위해서는 Google Maven 레포지토리를 프로젝트에 추가해야한다.
dependencies {
  def room_version = "2.2.6"

  implementation "androidx.room:room-runtime:$room_version"
  kapt "androidx.room:room-compiler:$room_version"

  // optional - Kotlin Extensions and Coroutines support for Room
  implementation "androidx.room:room-ktx:$room_version"

  // optional - Test helpers
  testImplementation "androidx.room:room-testing:$room_version"
}
컴파일러 옵션
- room.schemaLocation : DB 스킴을 JSON 파일로 만들어줌
- room.incremental : Room에서 Gradle의 incremental annotation을 허용
- room.expandProjection : (*) 프로젝션을 사용하는 쿼리에 대해 컴파일시에 정의된 컬럼명으로 재작성한다.
준비물
- RecyclerView와 adapters
- SQLite database와 the SQLite query language
- Basic coroutines
그리고 안드로이드 앱에서 권장하는 MVP, MVC와 같은 소프트웨어 아키텍쳐 패턴을 이용한다.
아키텍쳐 컴포넌트 이용
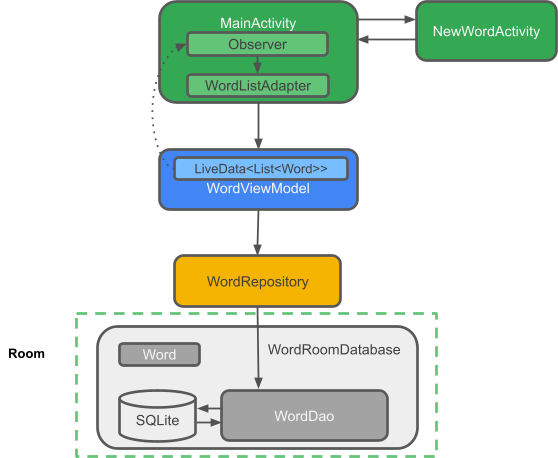
이 부분에서는 아키텍쳐 컴포넌트란 무엇인지 그리고 서로 어떻게 맞물려 동작하는지 살펴본다. 여기서는 LiveData, ViewModel, Room 이라고 알려진 컴포넌트를 사용한다. 아키텍쳐의 기본 골격은 다음과 같다.
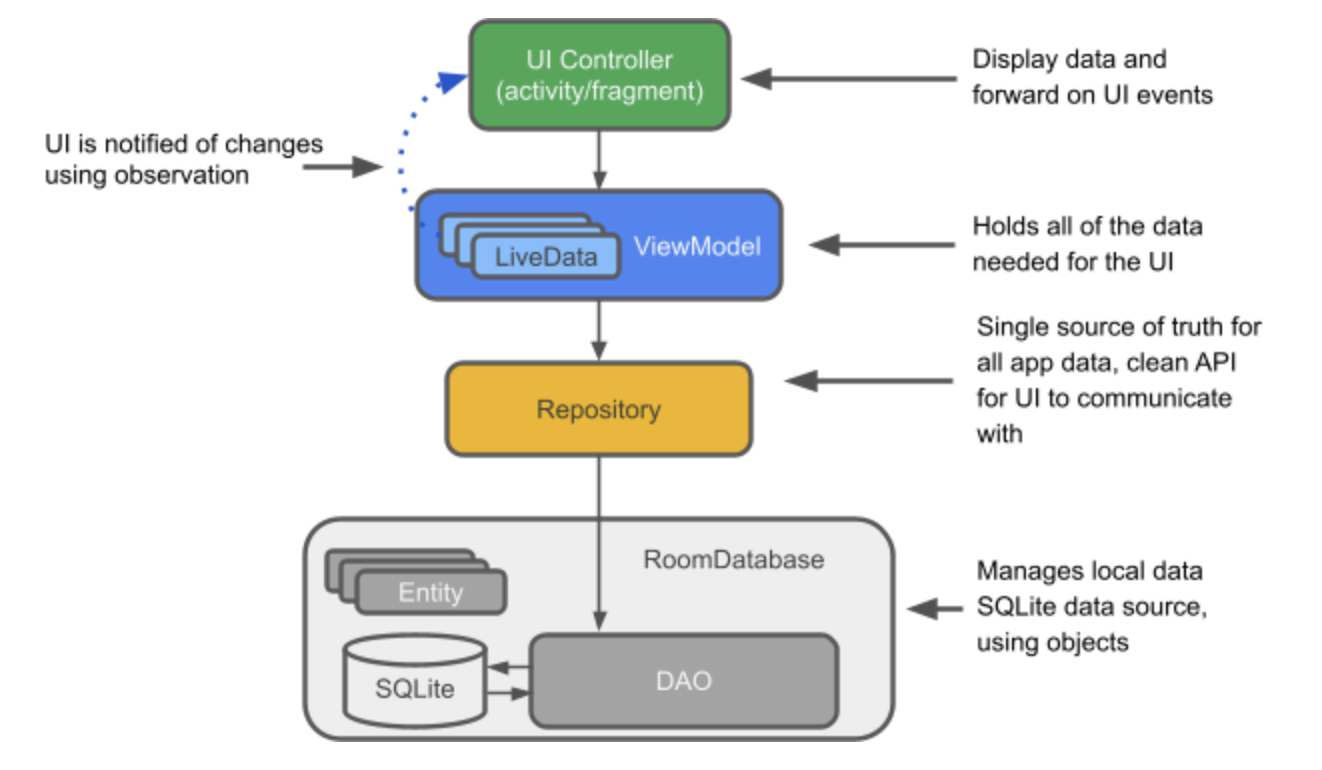
- Entity : DB 테이블.
- SQLite database : 영구 저장소. Room은 영구적인 DB를 생성하고 유지한다.
- DAO(Data Access Object) : SQL 쿼리를 함수들로 맵핑한 것들이다. DAO를 사용할 때 메소드만 호출하면 Room이 알아서 처리해준다.
- Room database : SQLite database에 접근할 수 있는 포인트를 제공한다. Room은 DAO를 이용해 SQLite database에 쿼리를 실행한다.
- Repository : 여러 개의 데이터 소스(서버, DB)를 사용하기 위해 만드는 레이어이다.
- ViewModel : Repository와 UI 사이의 커뮤니케이션 센터처럼 동작한다. UI단에서는 데이터에 대한 걱정을 할 필요 없다. ViewModel 객체들은 Activity와 Fragment의 생성 시점에 살아남는다.
- LiveData : 옵저빙할 수 있는 data holder 클래스이다. 최근 버전의 데이터를 항상 캐시하고 있고 변경이 있을 때 옵저버들에게 알려준다. LiveData는 라이프사이클을 인식한다. UI 컴포넌트들은 관련 있는 data만 옵저빙하고 옵저빙을 멈추거나 다시 할 필요 없다. LiveData는 자동적으로 라이프사이클 상태에 맞춰 모든 observer들을 관리해준다.
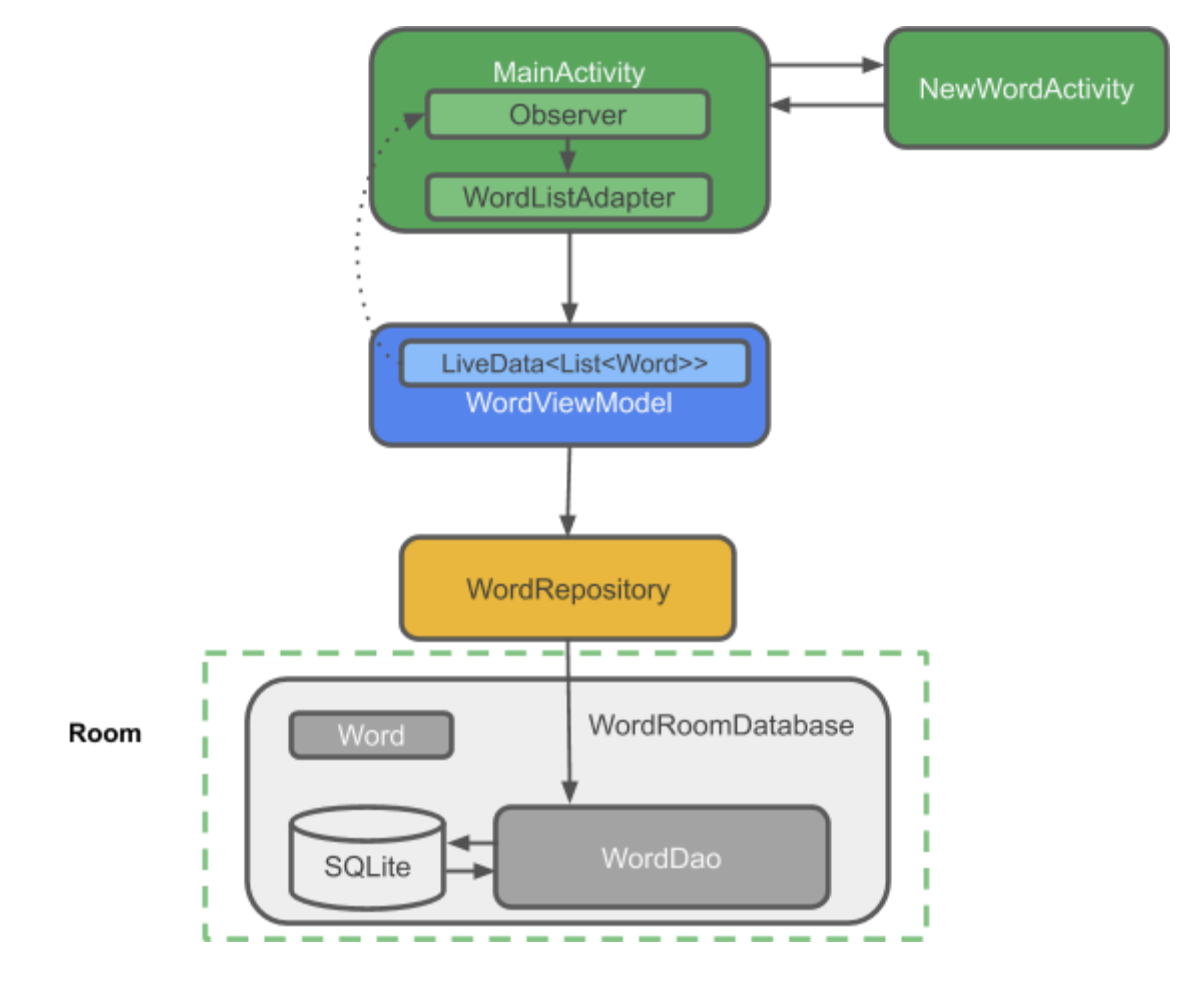
우리가 만들 샘플 앱의 아키텍처이다.
Gradle file 업데이트
App모듈의 build.gradle 파일을 업데이트한다.
Kapt 어노테이션 프로세서를 추가한다.
apply plugin: 'kotlin-kapt'android {} 블럭에 packagingOptions {} 블럭을 추가하고 atomic functions module을 추가한다.
그리고 jam target은 1.8로 한다.
android {

    // other configuration (buildTypes, defaultConfig, etc.)
    packagingOptions {
        exclude 'META-INF/atomicfu.kotlin_module'

    }


    kotlinOptions {
        jvmTarget = "1.8"
    }
}
아래와 같은 dependencies를 추가한다.
dependencies {
    implementation "androidx.appcompat:appcompat:$rootProject.appCompatVersion"
    implementation "androidx.activity:activity-ktx:$rootProject.activityVersion"

    // Dependencies for working with Architecture components
    // You'll probably have to update the version numbers in build.gradle (Project)
    // Room components
    implementation "androidx.room:room-ktx:$rootProject.roomVersion"
    kapt "androidx.room:room-compiler:$rootProject.roomVersion"
    androidTestImplementation "androidx.room:room-testing:$rootProject.roomVersion"

    // Lifecycle components
    implementation "androidx.lifecycle:lifecycle-viewmodel-ktx:$rootProject.lifecycleVersion"
    implementation "androidx.lifecycle:lifecycle-livedata-ktx:$rootProject.lifecycleVersion"
    implementation "androidx.lifecycle:lifecycle-common-java8:$rootProject.lifecycleVersion"

    // Kotlin components
    implementation "org.jetbrains.kotlin:kotlin-stdlib-jdk7:$kotlin_version"
    api "org.jetbrains.kotlinx:kotlinx-coroutines-core:$rootProject.coroutines"
    api "org.jetbrains.kotlinx:kotlinx-coroutines-android:$rootProject.coroutines"

    // UI
    implementation "androidx.constraintlayout:constraintlayout:$rootProject.constraintLayoutVersion"
    implementation "com.google.android.material:material:$rootProject.materialVersion"

    // Testing
    testImplementation "junit:junit:$rootProject.junitVersion"
    androidTestImplementation "androidx.arch.core:core-testing:$rootProject.coreTestingVersion"
    androidTestImplementation ("androidx.test.espresso:espresso-core:$rootProject.espressoVersion", {
        exclude group: 'com.android.support', module: 'support-annotations'
    })
    androidTestImplementation "androidx.test.ext:junit:$rootProject.androidxJunitVersion"
}
Project 경로의 build.gradle에는 다음 버전들을 추가한다.
ext {
    activityVersion = '1.1.0'
    appCompatVersion = '1.2.0'
    constraintLayoutVersion = '2.0.2'
    coreTestingVersion = '2.1.0'
    coroutines = '1.3.9'
    lifecycleVersion = '2.2.0'
    materialVersion = '1.2.1'
    roomVersion = '2.2.5'

    // testing
    junitVersion = '4.13.1'
    espressoVersion = '3.1.0'
    androidxJunitVersion = '1.1.2'
}
Entity 생성하기
이 샘플앱이 사용할 데이터는 단어들이다. 이런 샘플 테이블이 필요하다.
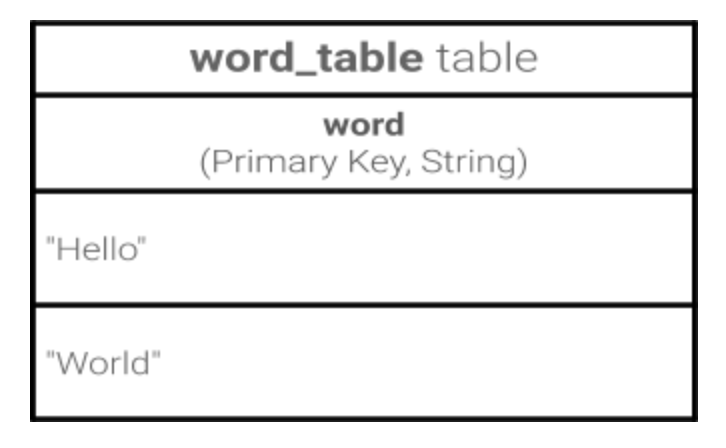
Room은 Entity를 통해서 테이블을 생성한다. 다음 스텝으로 테이블을 생성해보자.
1. Word라는 코틀린 data 클래스를 생성한다. 각 프로퍼티는 테이블의 컬럼을 나타낸다. Room은 이 프로퍼티를 테이블을 생성과 각 행들을 객체화 하기 위해서 사용한다.
data class Word(val word: String)이 Word라는 클래스와 Room database 사이에 연결고리는 코틀린 어노테이션을 이용한다. Room은 이 어노테이션을 코드 제너레이션을 위해 사용한다.
@Entity(tableName = "word_table") class Word(@PrimaryKey @ColumnInfo(name = "word") val word: String)- @Entity(tableName = "word_table") : 각 @Entity 클래스는 SQLite의 클래스를 의미한다. 클래스의 이름 대신에 테이블의 이름을 정의할 수 있다.
- @PrimaryKey : 각 Entity는 primary key가 필요하다.
- @ColumnInfo(name = "word") : 컬럼의 이름을 정의한다. 변수 이름과 다르게 하고 싶을 때 사용한다.
모든 프로퍼티들은 Public을 유지해야한다. (코틀린의 data class의 기본속성)
자동으로 생성되는 값을 가지는 컬럼을 만들수도 있다.
@PrimaryKey(autoGenerate = true) val id: IntDAO 만들기
DAO에서 SQL 쿼리들을 정의하면 컴파일러가 @Insert와 같은 어노테이션으로부터 쿼리를 생성해준다. Room은 가독성 좋은 API를 만들기 위해 DAO를 사용한다. DAO는 interface나 abstract 클래스여야 한다.
기본적으로 모든 쿼리는 워커 쓰레드에서 호출되어야한다.
Room은 코루틴을 지원한다. suspend 키워드와 함께 어노테이션을 사용하고 코루틴이나 다른 suspend 함수에서 호출하면 된다.
- 알파벳 순서로 모든 단어를 가져온다.
- 단어를 추가한다.
- 모든 단어를 지운다.
WordDao라는 클래스를 생성한다.
@Dao interface WordDao { @Query("SELECT * FROM word_table ORDER BY word ASC") fun getAlphabetizedWords(): List<Word> @Insert(onConflict = OnConflictStrategy.IGNORE) suspend fun insert(word: Word) @Query("DELETE FROM word_table") suspend fun deleteAll() }- WordDao는 인터페이스이다.
- @Dao는 Room에서 DAO 클래스를 정의한다.
- suspend fun insert(word: Word) : 단어를 추가하는 suspend 함수를 정의한다.
- @Insert 어노테이션만 사용하면 SQL 쿼리를 사용하지 않아도 된다.(@Delete와 @Update도 마찬가지이다.)
- onConflict = OnConflictStrategy.IGNORE : 새로운 단어를 추가할 때, 테이블에 동일한 것이 있으면 추가하지 않고 무시하는 정책이다.
- suspend fun deleteAll() : 모든 단어를 지우는 suspend 함수이다.
- @Query(“Delete FROM word_table”) : @Query는 복잡한 읽기나 다른 동작들을 정의할 수 있는 SQL 쿼리를 만들 수 있다.
- fun getAlphabetizedWords() : List<Word> : 모든 단어를 가져오는 메소드이다.
- @Query(“SELECT * FROM word_table ORDER BY word ASC”) : 오름차순으로 모든 단어들을 가져온다.
Database 변화 옵저빙하기
데이터를 옵저빙하고 있다가 변화하면 UI를 변경해보자. 데이터 변화를 옵저빙하기 위해서는 kotlinx-coroutines의 Flow를 사용할 것이다. 리턴 값으로 Flow를 이용하면 database가 변화했을 때 Room이 모든 코드를 Flow를 업데이트하기 위해 생성해준다.
WordDao에서 getAlphabetizedWords() 메소드를 호출하면 Flow로 랩핑해서 단어 리스트를 던져보자.
   @Query("SELECT * FROM word_table ORDER BY word ASC")
   fun getAlphabetizedWords(): Flow<List<Word>>
이 코드랩 이후에 Flow를 ViewModel의 LiveData로 변화시킬 것이다.
Room database 만들기
- Room은 SQLite database의 레이어 역할을 한다.
- Room은 SQLiteOpenHelper로 처리하던 지저분한 코드들을 대신 처리해준다.
- Room은 database에 쿼리를 사용하기 위해서 DAO를 사용한다.
- Room은 메인쓰레드로 쿼리를 하지 못하도록 한다. Room은 쿼리를 Flow로 리턴하면, 워커 쓰레드에서 자동적으로 쿼리가 수행되게 한다.
- Room은 SQLite 쿼리문을 compile-time에 체크한다.
Room database는 RoomDatabase를 상속해 abstract 클래스로 만든다. 앱에서 Room database의 객체는 하나여야한다.
WordRoomDatabase라는 클래스를 만든다.
// Annotates class to be a Room Database with a table (entity) of the Word class @Database(entities = arrayOf(Word::class), version = 1, exportSchema = false) public abstract class WordRoomDatabase : RoomDatabase() { abstract fun wordDao(): WordDao companion object { // Singleton prevents multiple instances of database opening at the // same time. @Volatile private var INSTANCE: WordRoomDatabase? = null fun getDatabase(context: Context): WordRoomDatabase { // if the INSTANCE is not null, then return it, // if it is, then create the database return INSTANCE ?: synchronized(this) { val instance = Room.databaseBuilder( context.applicationContext, WordRoomDatabase::class.java, "word_database" ).build() INSTANCE = instance // return instance instance } } } }- Room의 database 클래스는 RoomDatabase를 상속한 abstract 클래스이다.
- @Database 어노테이션으로 Room database를 정의하고 이 database에 속할 Entity와 버전을 파라미터로 명시한다.
- exportSchema 파라미터는 기본으로 true이다. true일 경우, database 스키마를 한 파일에 볼 수 있는 Json 타입 파일을 생성해줌으로써 Entity들의 히스토리를 트래킹할 수 있도록 해준다.
- 각 @Dao의 메소드들을 참조한다.
- WordRoomDatabase는 싱글톤이고 이는 동시에 여러 객체가 database를 열 수 없도록 제한한다.
- getDatabase 는 싱글톤을 리턴하고 접근한 첫 시점에 database를 생성하고 Room의 database 빌더를 이용해 RoomDatabase를 생성한다. WordRoomDatabase클래스는 word_database라는 이름을 가진다.
ViewModel을 만들자
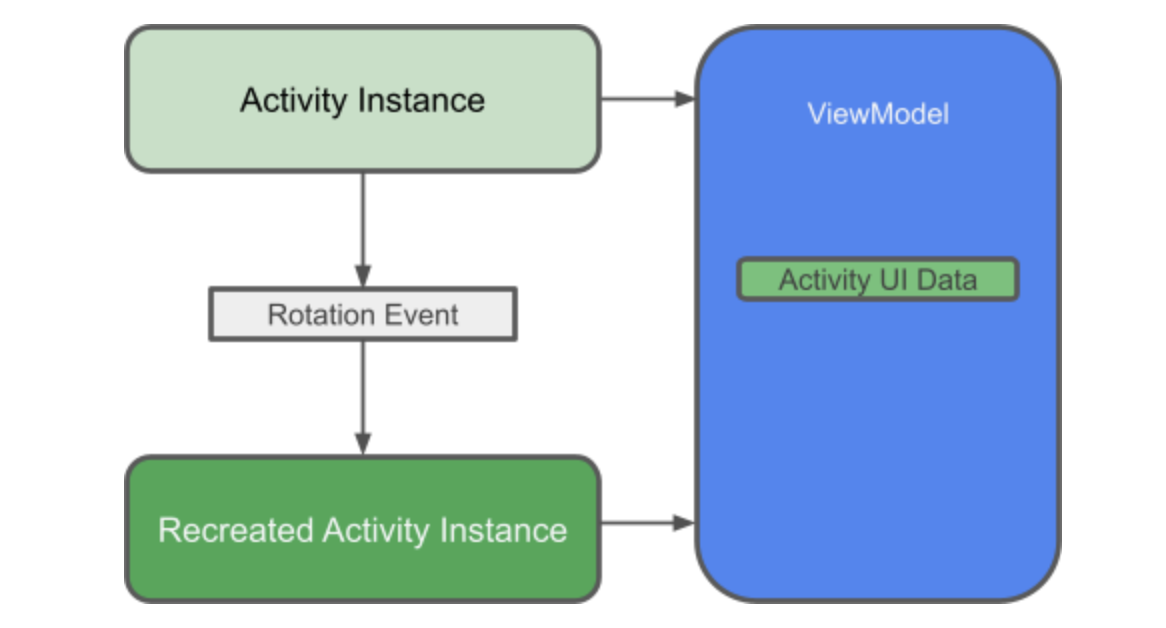
ViewModel이란 데이터를 UI에 제공하고 상태변화에서도 데이터를 유지한다. ViewModel은 Ropository와 UI사이의 커뮤니케이션 센터처럼 동작한다. ViewModel은 프레그먼트들 사이에서도 사용할 수 있다. ViewModel은 라이프사이클 라이브러리(https://developer.android.com/topic/libraries/architecture/lifecycle.html) 소속이다.
LiveData와 ViewModel
ViewModel은 상태값 변화에서도 유지되는 라이프사이클을 아는 UI 데이터를 들고 있다. UI 데이터를 Activity와 Fragment로 분리하는 것은 단일 책임의 법칙을 더 잘 따르는 방법이다. 즉, Activity와 Fragment는 스크린에 데이터를 그리는 역할만 하는 것이다. 만면 ViewModel은 UI가 필요로하는 데이터를 들고 처리하는 역할만 한다.
LiveData는 옵저빙할 수 있는 데이터를 들고 있다. 즉, 데이터가 변경될 때마다 알림을 받을 수 있다. Flow와 다르게 LiveData는 라이프사이클을 잘 알고 있다. 이 말은 Activity나 Fragment와 같은 다른 컴포넌트의 라이프사이클을 따른다는 말이다. LiveData는 자동적으로 라이프사이클을 가진 컴포넌트를 따라 옵저빙을 자동으로 stop/resume할 수 있다. 이는 LiveData가 UI를 표시하는데에 완벽한 컴포넌트로서 사용되도록 한다.
viewModelScope
코틀린에서는 모든 코루틴이 CoroutineScope에서 동작한다. 이 스콥은 Job이라는 것을 리턴하는데 이 Job을 이용해 코루틴들의 라이프타임을 조절한다. 스콥의 Job을 취소할 때, 그 스콥에서 시작했던 모든 코루틴을 종료한다.
AndroidX의 lifecycle-viewmodel-ktx 라이브러리는 viewModelScope을 확장 함수로 추가하고 있다.
ViewModel에서 코루틴을 사용하기 위한 예제는 아래 페이지들을 참고한다.
https://developer.android.com/codelabs/kotlin-coroutines/index.html?index=..%2F..index#4
https://medium.com/androiddevelopers/easy-coroutines-in-android-viewmodelscope-25bffb605471
ViewModel 구현하기
WordViewModel이라는 클래스를 추가한다.
class WordViewModel(private val repository: WordRepository) : ViewModel() { // Using LiveData and caching what allWords returns has several benefits: // - We can put an observer on the data (instead of polling for changes) and only update the // the UI when the data actually changes. // - Repository is completely separated from the UI through the ViewModel. val allWords: LiveData<List<Word>> = repository.allWords.asLiveData() /** * Launching a new coroutine to insert the data in a non-blocking way */ fun insert(word: Word) = viewModelScope.launch { repository.insert(word) } } class WordViewModelFactory(private val repository: WordRepository) : ViewModelProvider.Factory { override fun <T : ViewModel> create(modelClass: Class<T>): T { if (modelClass.isAssignableFrom(WordViewModel::class.java)) { @Suppress("UNCHECKED_CAST") return WordViewModel(repository) as T } throw IllegalArgumentException("Unknown ViewModel class") } }- ViewModel을 상속한 WordViewModel을 생성했다. WordRepository를 생성자에 파라미터로 받는다. Repository는 ViewModel이 필요로하는 데이터를 제공한다.
- LiveData를 단어들을 캐시하기 위한 멤버변수로 추가한다.
- LiveData는 Repository의 allWords Flow로 초기화된다. asLiveData()를 호출해서 Flow를 LiveData로 변경한다.
- Repository의 insert() 메소드를 호출하는 instert() 메소드를 만든다. insert()의 구현은 UI로부터 캡슐화된다. 또한 insert()를 호출하면 새로운 코루틴이 생성되고 suspend 함수를 호출한다. ViewModel은 코루틴 스콥을 가지고 있고 이는 viewModelScope이라고 불리는 라이프사이클이 있다.(?)
- ViewModel을 생성하기 위해서는 ViewModelProvider.Factory를 구현해야한다. ViewModelProvider.Factory는 WordRepository를 파라미터로 받아 WordViewModel을 생성한다.
- viewModel과 ViewModelProvider.Factory를 사용함으로써 프레임워크가 ViewModel의 라이프사이클을 관리해주게 된다. 이는 상태 변화에서도 데이터가 유지되게 해주고 Activity가 재생성되더라도 WordViewModel의 객체를 제대로 들고 있게 해준다.(?)
XML 레이아웃 추가하기
우선 메터리얼 디자인 테마를 추가해보자.
values/styles.xml 에
<resources>
    <!-- Base application theme. -->
    <style name="AppTheme" parent="Theme.MaterialComponents.Light.DarkActionBar">
        <!-- Customize your theme here. -->
        <item name="colorPrimary">@color/colorPrimary</item>
        <item name="colorPrimaryDark">@color/colorPrimaryDark</item>
        <item name="colorAccent">@color/colorAccent</item>
    </style>

    <!-- The default font for RecyclerView items is too small.
    The margin is a simple delimiter between the words. -->
    <style name="word_title">
        <item name="android:layout_marginBottom">8dp</item>
        <item name="android:paddingLeft">8dp</item>
        <item name="android:background">@android:color/holo_orange_light</item>
        <item name="android:textAppearance">@android:style/TextAppearance.Large</item>
    </style>
</resources>
를 추가한다.
values/dimens.xml 에는
<dimen name="big_padding">16dp</dimen>를 추가한다.
layout/activity_main.xml 에는 TextView와 RecyclerView를 추가한다.
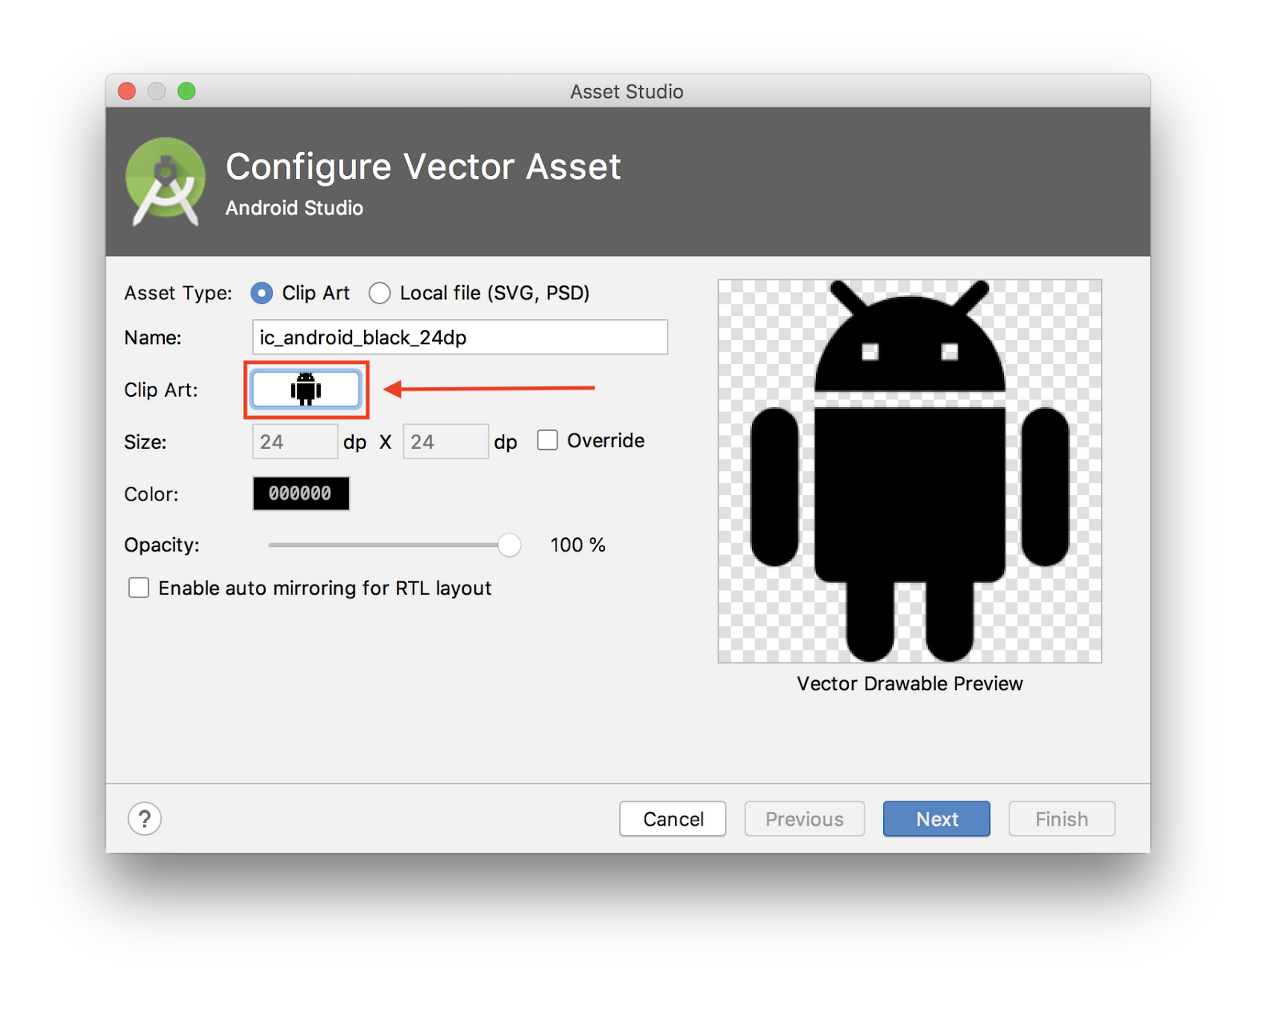
<androidx.constraintlayout.widget.ConstraintLayout
    xmlns:android="http://schemas.android.com/apk/res/android"
    xmlns:app="http://schemas.android.com/apk/res-auto"
    xmlns:tools="http://schemas.android.com/tools"
    android:layout_width="match_parent"
    android:layout_height="match_parent"
    tools:context=".MainActivity">

    <androidx.recyclerview.widget.RecyclerView
        android:id="@+id/recyclerview"
        android:layout_width="0dp"
        android:layout_height="0dp"
        tools:listitem="@layout/recyclerview_item"
        android:padding="@dimen/big_padding"
        app:layout_constraintBottom_toBottomOf="parent"
        app:layout_constraintLeft_toLeftOf="parent"
        app:layout_constraintRight_toRightOf="parent"
        app:layout_constraintTop_toTopOf="parent" />

    <com.google.android.material.floatingactionbutton.FloatingActionButton
        android:id="@+id/fab"
        app:layout_constraintBottom_toBottomOf="parent"
        app:layout_constraintEnd_toEndOf="parent"
        android:layout_width="wrap_content"
        android:layout_height="wrap_content"
        android:layout_margin="16dp"
        android:contentDescription="@string/add_word"/>

</androidx.constraintlayout.widget.ConstraintLayout>
Vector Asset들을 만든다.
File > New > Vector Asset 를 실행한 뒤에 Clip Art 에서 안드로이드 로봇을 클릭한다.
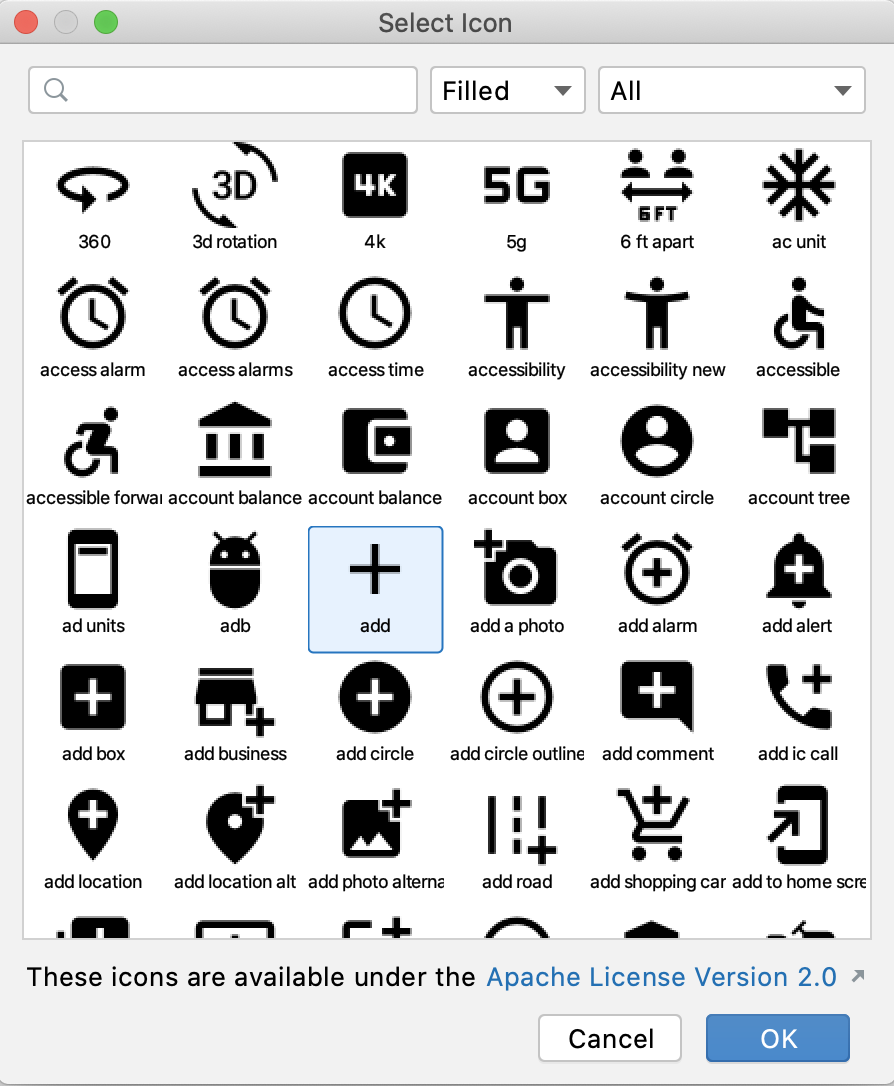
여기서 "add" 아이콘을 선택한다.
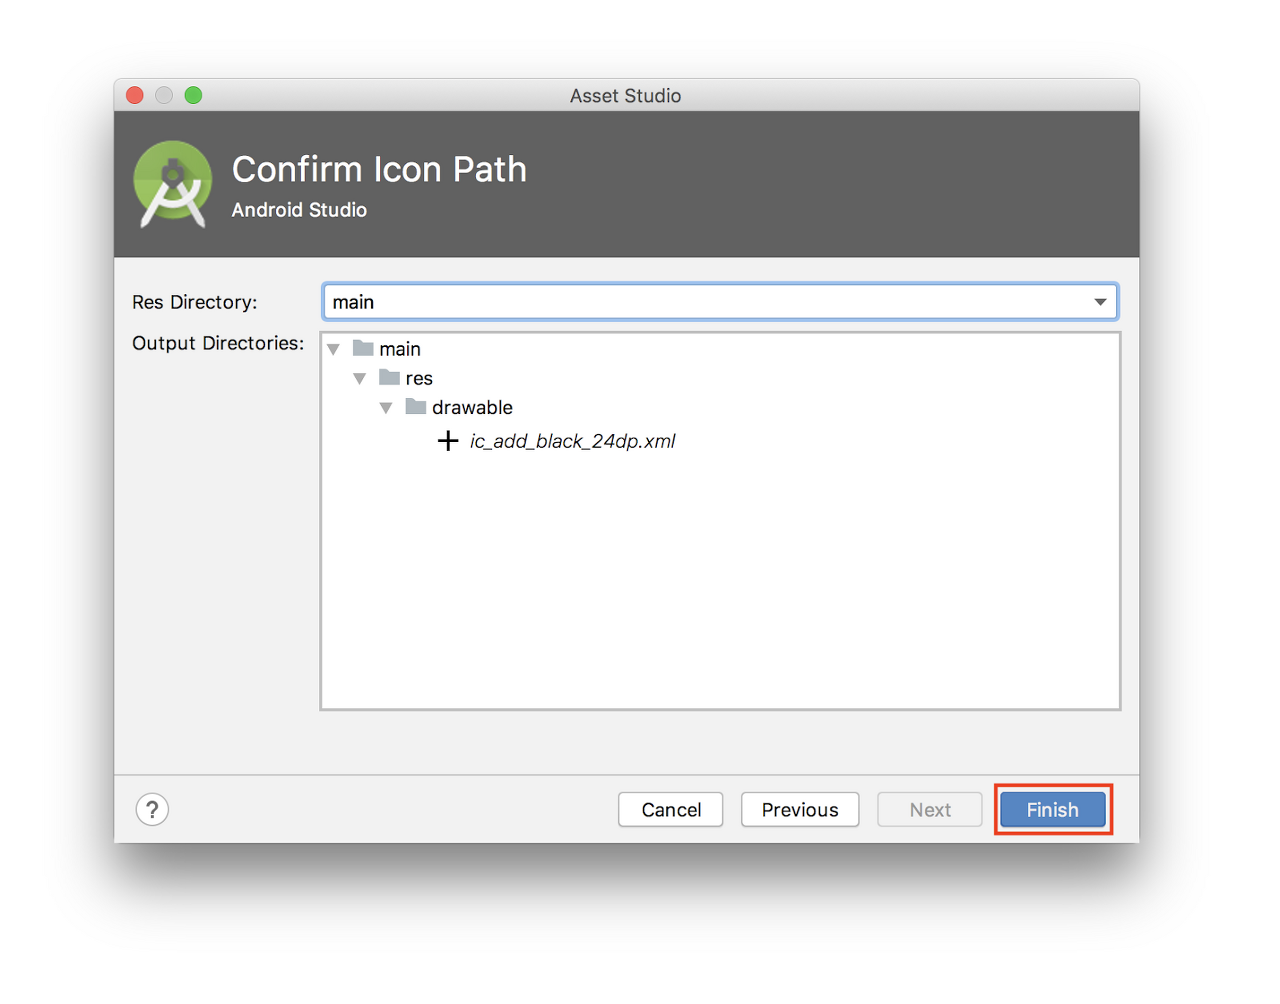
Next를 누른 뒤 main > drawable 에 추가한다.
layout/activity_main.xml 에서 추가한 drawable로 설정한다.
<com.google.android.material.floatingactionbutton.FloatingActionButton
        android:id="@+id/fab"
        app:layout_constraintBottom_toBottomOf="parent"
        app:layout_constraintEnd_toEndOf="parent"
        android:layout_width="wrap_content"
        android:layout_height="wrap_content"
        android:layout_margin="16dp"
        android:contentDescription="@string/add_word"
        android:src="@drawable/ic_add_black_24dp"/>
RecyclerView 추가하기
RecyclerView에 TextView를 붙여서 데이터를 표시할 것이다. RecyclerView, RecyclerView.ViewHolder, ListAdapter를 이용해보자.
- WordListAdapter는 ListAdapter를 상속한다.
- 중첩된 DiffUtil.ItemCallback 클래스는 WordListAdapter의 일부이다.
- ViewHolder는 리스트에 한 단어를 의미한다.
class WordListAdapter : ListAdapter<Word, WordViewHolder>(WordsComparator()) {

    override fun onCreateViewHolder(parent: ViewGroup, viewType: Int): WordViewHolder {
        return WordViewHolder.create(parent)
    }

    override fun onBindViewHolder(holder: WordViewHolder, position: Int) {
        val current = getItem(position)
        holder.bind(current.word)
    }

    class WordViewHolder(itemView: View) : RecyclerView.ViewHolder(itemView) {
        private val wordItemView: TextView = itemView.findViewById(R.id.textView)

        fun bind(text: String?) {
            wordItemView.text = text
        }

        companion object {
            fun create(parent: ViewGroup): WordViewHolder {
                val view: View = LayoutInflater.from(parent.context)
                    .inflate(R.layout.recyclerview_item, parent, false)
                return WordViewHolder(view)
            }
        }
    }

    class WordsComparator : DiffUtil.ItemCallback<Word>() {
        override fun areItemsTheSame(oldItem: Word, newItem: Word): Boolean {
            return oldItem === newItem
        }

        override fun areContentsTheSame(oldItem: Word, newItem: Word): Boolean {
            return oldItem.word == newItem.word
        }
    }
}
WordViewHoler는 TextView에 텍스트를 바인딩해준다. create()라는 static 함수는 레이아웃을 메모리에 올리도록 해준다.
WordsComparator는 두 단어가 같거나 혹은 컨텐츠가 동일한지 아닌지 계산하는 방법을 제공한다.
WordListAdapter는 onCreateViewHolder에서 WordViewHolder를 생성하고 onBindViewHolder에서 데이터를 바인딩한다.
MainActivity의 onCreate()에서 RecyclerView를 추가한다.
   val recyclerView = findViewById<RecyclerView>(R.id.recyclerview)
   val adapter = WordListAdapter()
   recyclerView.adapter = adapter
   recyclerView.layoutManager = LinearLayoutManager(this)
Repository와 database 초기화하기
Repository와 database의 객체는 앱에서 하나만 있어야한다. 예제에서는 Application 클래스에서 생성한다. 두 필드는 by lazy를 이용해서 객체가 늦게 생성되도록 한다.
class WordsApplication : Application() { // Using by lazy so the database and the repository are only created when they're needed // rather than when the application starts val database by lazy { WordRoomDatabase.getDatabase(this) } val repository by lazy { WordRepository(database.wordDao()) } }AndroidManifest.xml에 우리가 생성한 WordsApplication을 사용하겠다고 선언한다.
<application
        android:name=".WordsApplication"
        android:allowBackup="true"
        android:icon="@mipmap/ic_launcher"
        android:label="@string/app_name"
        android:roundIcon="@mipmap/ic_launcher_round"
        android:supportsRtl="true"
        android:theme="@style/AppTheme">
...
Database 에 데이터 채우기
Database에는 아직 데이터가 없다. 우선은 database가 생성되면 몇 개의 단어를 추가하고 Activity에서 직접 단어를 추가해보자.
모든 데이터를 삭제하고 database에 데이터를 새로 채우기 위해서는 RoomDatabase.Callback에서 onCreate()를 상속해야한다. 왜냐하면 Room database는 UI 쓰레드에서 동작하지 않기때문에 onCreate()에서 IO Dispatcher를 이용해 코루틴을 실행해야한다.
코루틴을 실행하기위해서 CoroutineScope이 필요하다. getDatabase() 메소드의 파라미터로 CoroutineScope을 받아오도록 업데이트한다.
fun getDatabase(
       context: Context,
       scope: CoroutineScope
  ): WordRoomDatabase {
...
}
Database 에 데이터 채우기는 UI 라이프사이클과 관련이 없기때문에 viewModelScope과 같은 CoroutineScope을 사용하면 안 된다. 이는 어플리케이션 라이프사이클과 더 관련이 있다. 따라서 applicationScope을 사용하기 위해 WordApplication을 업데이트해보자.
class WordsApplication : Application() { // No need to cancel this scope as it'll be torn down with the process val applicationScope = CoroutineScope(SupervisorJob()) // Using by lazy so the database and the repository are only created when they're needed // rather than when the application starts val database by lazy { WordRoomDatabase.getDatabase(this, applicationScope) } val repository by lazy { WordRepository(database.wordDao()) } }WordRoomDatabase에서 RoomDatabase.Callback()의 구현부를 만들어보자. CoroutineScope을 생성자 파라미터로 얻어와보자. onOpen() 메소드를 상속한다.
private class WordDatabaseCallback(
    private val scope: CoroutineScope
) : RoomDatabase.Callback() {

    override fun onCreate(db: SupportSQLiteDatabase) {
        super.onCreate(db)
        INSTANCE?.let { database ->
            scope.launch {
                populateDatabase(database.wordDao())
            }
        }
    }

    suspend fun populateDatabase(wordDao: WordDao) {
        // Delete all content here.
        wordDao.deleteAll()

        // Add sample words.
        var word = Word("Hello")
        wordDao.insert(word)
        word = Word("World!")
        wordDao.insert(word)

        // TODO: Add your own words!
    }
}
이 콜백을 Room.databaseBuilder() 빌더에 추가할 수 있다.
.addCallback(WordDatabaseCallback(scope))전체코드이다.
@Database(entities = arrayOf(Word::class), version = 1, exportSchema = false)
abstract class WordRoomDatabase : RoomDatabase() {

   abstract fun wordDao(): WordDao

   private class WordDatabaseCallback(
       private val scope: CoroutineScope
   ) : RoomDatabase.Callback() {

       override fun onCreate(db: SupportSQLiteDatabase) {
           super.onCreate(db)
           INSTANCE?.let { database ->
               scope.launch {
                   var wordDao = database.wordDao()

                   // Delete all content here.
                   wordDao.deleteAll()

                   // Add sample words.
                   var word = Word("Hello")
                   wordDao.insert(word)
                   word = Word("World!")
                   wordDao.insert(word)

                   // TODO: Add your own words!
                   word = Word("TODO!")
                   wordDao.insert(word)
               }
           }
       }
   }

   companion object {
       @Volatile
       private var INSTANCE: WordRoomDatabase? = null

       fun getDatabase(
           context: Context,
           scope: CoroutineScope
       ): WordRoomDatabase {
            // if the INSTANCE is not null, then return it,
            // if it is, then create the database
            return INSTANCE ?: synchronized(this) {
                val instance = Room.databaseBuilder(
                        context.applicationContext,
                        WordRoomDatabase::class.java,
                        "word_database"
                )
                 .addCallback(WordDatabaseCallback(scope))
                 .build()
                INSTANCE = instance
                // return instance
                instance
        }
     }
   }
}
NewWordActivity 추가하기
values/strings.xml 에 다음 리소스를 추가한다.
<string name="hint_word">Word...</string>
<string name="button_save">Save</string>
<string name="empty_not_saved">Word not saved because it is empty.</string>
<string name="add_word">Add word</string>
value/colors.xml 에도 리소스를 추가한다.
<color name="buttonLabel">#FFFFFF</color>values/dimens.xml에도 리소스를 추가한다.
<dimen name="min_height">48dp</dimen>새로운 Activity를 추가한다.
activity_new_word.xml 코드 이다.
<LinearLayout xmlns:android="http://schemas.android.com/apk/res/android"
    android:orientation="vertical"
    android:layout_width="match_parent"
    android:layout_height="match_parent">

    <EditText
        android:id="@+id/edit_word"
        android:layout_width="match_parent"
        android:layout_height="wrap_content"
        android:minHeight="@dimen/min_height"
        android:fontFamily="sans-serif-light"
        android:hint="@string/hint_word"
        android:inputType="textAutoComplete"
        android:layout_margin="@dimen/big_padding"
        android:textSize="18sp" />

    <Button
        android:id="@+id/button_save"
        android:layout_width="match_parent"
        android:layout_height="wrap_content"
        android:background="@color/colorPrimary"
        android:text="@string/button_save"
        android:layout_margin="@dimen/big_padding"
        android:textColor="@color/buttonLabel" />

</LinearLayout>
NewWordActivity.kt 코드 이다.
class NewWordActivity : AppCompatActivity() {

    private lateinit var editWordView: EditText

    public override fun onCreate(savedInstanceState: Bundle?) {
        super.onCreate(savedInstanceState)
        setContentView(R.layout.activity_new_word)
        editWordView = findViewById(R.id.edit_word)

        val button = findViewById<Button>(R.id.button_save)
        button.setOnClickListener {
            val replyIntent = Intent()
            if (TextUtils.isEmpty(editWordView.text)) {
                setResult(Activity.RESULT_CANCELED, replyIntent)
            } else {
                val word = editWordView.text.toString()
                replyIntent.putExtra(EXTRA_REPLY, word)
                setResult(Activity.RESULT_OK, replyIntent)
            }
            finish()
        }
    }

    companion object {
        const val EXTRA_REPLY = "com.example.android.wordlistsql.REPLY"
    }
}
데이터와 UI 연결하기
이제 새로운 단어를 입력하면 database에 추가해보자. 그리고 database에 있는 단어들을 화면에 표시하기위해 LiveData를 옵저빙할 것이다. 데이터가 변경될 때마다 onChanged() 콜백이 호출되고 adapter의 setWords()를 호출해 리스트를 갱신한다.
MainActivity에 ViewModel을 만든다.
ViewModel을 생성하기 위해서 viewModels delegate를 사용하고 WordViewModelFactory의 객체를 전달한다. WordViewModelFactory의 생성자 파라미터는 WordsApplication이다.
onCreate()에는 모든 단어를 옵저빙하는 WordViewModel의 LiveData를 추가한다.
onChanged()메소드는 데이터가 변경될 때와 Activity가 포그라운드에 있을 때만 호출된다.
wordViewModel.allWords.observe(this, Observer { words ->
            // Update the cached copy of the words in the adapter.
            words?.let { adapter.submitList(it) }
})
플로팅버튼을 선택하면 NewWordActivity를 시작할 것이고 MainActivity로 돌아오면 database에 단어를 삽입하고 토스트를 표시한다.
Request code부터 시작해보자.
private val newWordActivityRequestCode = 1
MainActivity에서 onActivityResult()에 코드를 추가한다.
RESULT_OK로 돌아왔을 때, WordViewModel의 insert() 메소드를 호출하여 database에 단어를 추가한다.
override fun onActivityResult(requestCode: Int, resultCode: Int, data: Intent?) { super.onActivityResult(requestCode, resultCode, data) if (requestCode == newWordActivityRequestCode && resultCode == Activity.RESULT_OK) { data?.getStringExtra(NewWordActivity.EXTRA_REPLY)?.let { val word = Word(it) wordViewModel.insert(word) } } else { Toast.makeText( applicationContext, R.string.empty_not_saved, Toast.LENGTH_LONG).show() } }MainActivity에서 플로팅버튼을 누르면 NewWordActivity를 시작한다. MainActivity의 onCreate()에서 플로팅버튼을 찾아 onClick 리스너를 연결한다.
val fab = findViewById<FloatingActionButton>(R.id.fab)
fab.setOnClickListener {
  val intent = Intent(this@MainActivity, NewWordActivity::class.java)
  startActivityForResult(intent, newWordActivityRequestCode)
}
전체 코드는 다음과 같다.
class MainActivity : AppCompatActivity() {

    private val newWordActivityRequestCode = 1
    private val wordViewModel: WordViewModel by viewModels {
        WordViewModelFactory((application as WordsApplication).repository)
    }

    override fun onCreate(savedInstanceState: Bundle?) {
        super.onCreate(savedInstanceState)
        setContentView(R.layout.activity_main)

        val recyclerView = findViewById<RecyclerView>(R.id.recyclerview)
        val adapter = WordListAdapter()
        recyclerView.adapter = adapter
        recyclerView.layoutManager = LinearLayoutManager(this)

        // Add an observer on the LiveData returned by getAlphabetizedWords.
        // The onChanged() method fires when the observed data changes and the activity is
        // in the foreground.
        wordViewModel.allWords.observe(owner = this) { words ->
            // Update the cached copy of the words in the adapter.
            words.let { adapter.submitList(it) }
        }

        val fab = findViewById<FloatingActionButton>(R.id.fab)
        fab.setOnClickListener {
            val intent = Intent(this@MainActivity, NewWordActivity::class.java)
            startActivityForResult(intent, newWordActivityRequestCode)
        }
    }

    override fun onActivityResult(requestCode: Int, resultCode: Int, intentData: Intent?) {
        super.onActivityResult(requestCode, resultCode, intentData)

        if (requestCode == newWordActivityRequestCode && resultCode == Activity.RESULT_OK) {
            intentData?.getStringExtra(NewWordActivity.EXTRA_REPLY)?.let { reply ->
                val word = Word(reply)
                wordViewModel.insert(word)
            }
        } else {
            Toast.makeText(
                applicationContext,
                R.string.empty_not_saved,
                Toast.LENGTH_LONG
            ).show()
        }
    }
}
이제 NewWordActivity를 이용해 단어를 추가하면 자동적으로 UI가 없데이트 될 것이다.
요약
다시 한 번 구조를 보자.
- MainActivity : 단어 리스트를 보여주는 RecyclerView가 있다. Observer가 있고 database로부터 단어를 옵저빙해서 변화가 있을 때 노티를 받는다.
- NewWordActivity : 리스트에 새로운 단어를 추가한다.
- WordViewModel : 데이터 레이어에 접근하는 메소드들을 제공한다. LiveData를 리턴해서 MainActivity와 옵저버 관계를 만든다.
- LiveData<List<Word>> : UI 컴포넌트가 자동적으로 업데이트 되도록 한다. Flow에서 LiveData로 변경하기 위해서는 flow.toLiveData()를 호출한다.
- Repository : 하나 이상의 데이터 소스를 관리한다.(ex. 서버1, 서버2, DB) Repository는 ViewModel이 데이터 제공자와 상호작용할 수 있도록 메소드를 제공한다. 이 앱에서 데이터 제공자는 Room database이다.
- Room : SQLite database를 구현하고 있고 래퍼 클래스이다.
- DAO : database 쿼리를 호출하는 메소드를 구현하고 있다. Repository가 getAlphabetizedWord()를 호출하면, Room은 “SELECT * FROM wordd_table TORDER BY word ASC”를 실행한다.
- DAO는 suspend와 Flow의 쿼리를 가지고 있다. Flow는 비동기 작업이 완료되면 노티를 받을 수 있도록 해준다.
- Word : 한 단어씩 담을 수 있는 Entity 클래스이다.
- Views and Activities(and Fragment) : ViewModel을 통해서만 데이터를 가져올 수 있다. 이 데이터가 서버로부터 오는지 DB로부터 오는지 알 필요가 없다.
sample codes - github.com/SeungwonLee/RoomCodelab
반응형'프로그래밍 > Android' 카테고리의 다른 글
Large Screen - Google i/o 2021 (0) 2021.09.06 Large screen (0) 2021.08.31 MediaPlayer:안드로이드에서 간단한 비디오 재생 (0) 2020.11.21 Google i/o 2018 - ExoPlayer 2.8 (0) 2018.06.06 Property View (0) 2017.12.20